Smart Terminal Device Ordering and Activation
Whatever your businesses size or industry, we offer checking solutions that are built to meet your needs, support your vision, and keep you moving forward.
Activation support topics
Get answers to the questions most frequently asked by business owners just starting out with Smart Terminal.
Order your new terminal
To order a new terminal, please contact our sales team at 877-843-5690.
For refunds or replacements of your terminal, please contact our support team at 888-659-4961.
Terminal activation
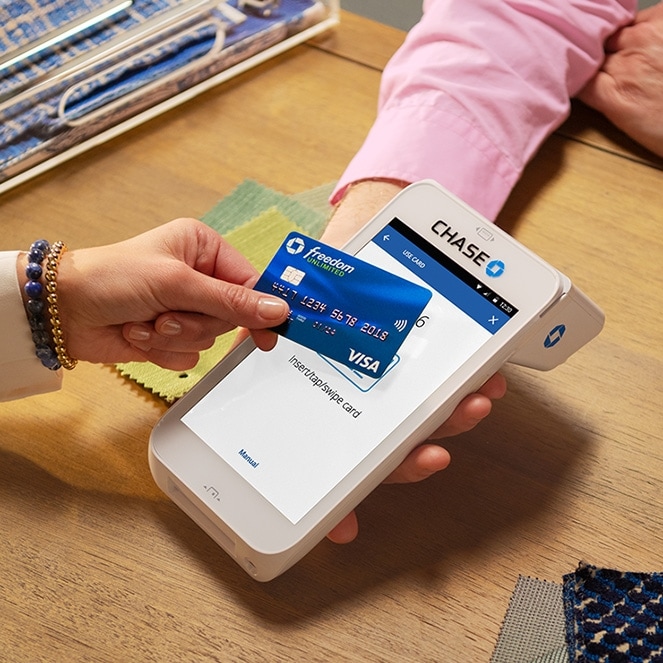
The Smart Terminal will be automatically activated when turned on for the first time.
- Turn the terminal on by pressing down the power button for 3 seconds.
- You'll be automatically prompted to choose your Wi-Fi network, enter any network authentication required.
- The terminal will not ensure it has the latest updates for you, press Finish when it is complete.
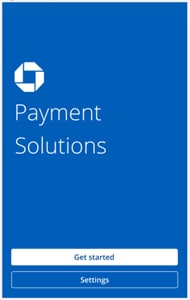
- When the system completes loading you will be presented with the launcher screen. Here you can launch the POS or modify the Device Settings.
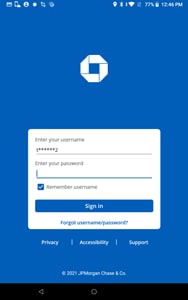
- Sign on to the Smart Terminal app by using your primary Chase.com credentials.
- You'll then be prompted to send a code by phone or email to complete your device’s first sign-in experience.
- Enter your code and password to authenticate the device.
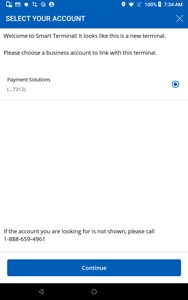
- Follow the on-screen prompts to complete terminal association with your desired account:
- Select the Chase account (CBCB or Chase Payment Solutions account)
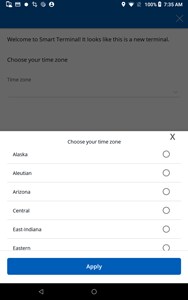
- Select your time zone.
- Assign a name for your device, this will allow you to identify the terminal in your reporting features.
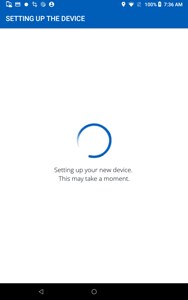
- At this point, the terminal just needs to wait on a few updates to add the terminal to our systems – it may take a couple moments to complete.
- Once the terminal has been assigned, you'll be prompted to complete a wizard to quickly set up your tip and tax settings. You can skip this if this is your second terminal or you want to adjust the settings manually.

- After charging your terminal, turn it on by pressing and holding the power button on the right side. The Chase Payment Solutions screen will be displayed when the device has started.
- Enter the manager code
- Swipe down from the top of the screen
- Tap on the Operator item listed
- Enter the default manager code 9 9 9 9 9 9 and tap ‘ENTER’
- You will be returned to the launcher screen
- From the launcher screen, tap the “Settings” button. Then tap ‘WiFi’ to connect to your wireless network
- Exit manager mode by swiping down from the top of the screen and tapping the ‘Manager’ item listed
Check with your local Wi-Fi administrator to verify the Wi-Fi name and password.
It is recommended that you run a test transaction. The first transaction allows the terminal to complete its configuration, this can take slightly longer and ensures everything is setup and ready for your customers.
If you experience any trouble processing this first transaction, please reach out to our support team for further assistance.
Your Smart Terminal may not be fully charged. Ensure your Smart Terminal is properly connected to a power source. To power on the device, you will need to hold the power button for about 5 seconds. You should hear a slight click as the printer turns on.
If you continue to have this issue, please contact the Chase Smart terminal support team at 1-888-659-4961 for further assistance.
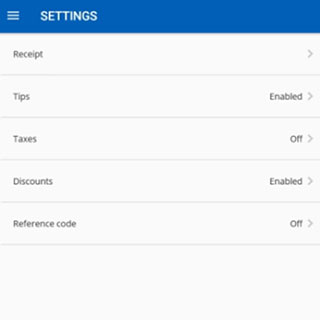
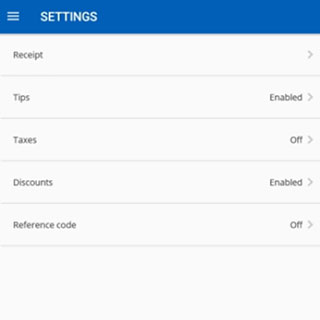
Adjusting merchant settings
You can configure merchant receipts to be printed and/or emailed.
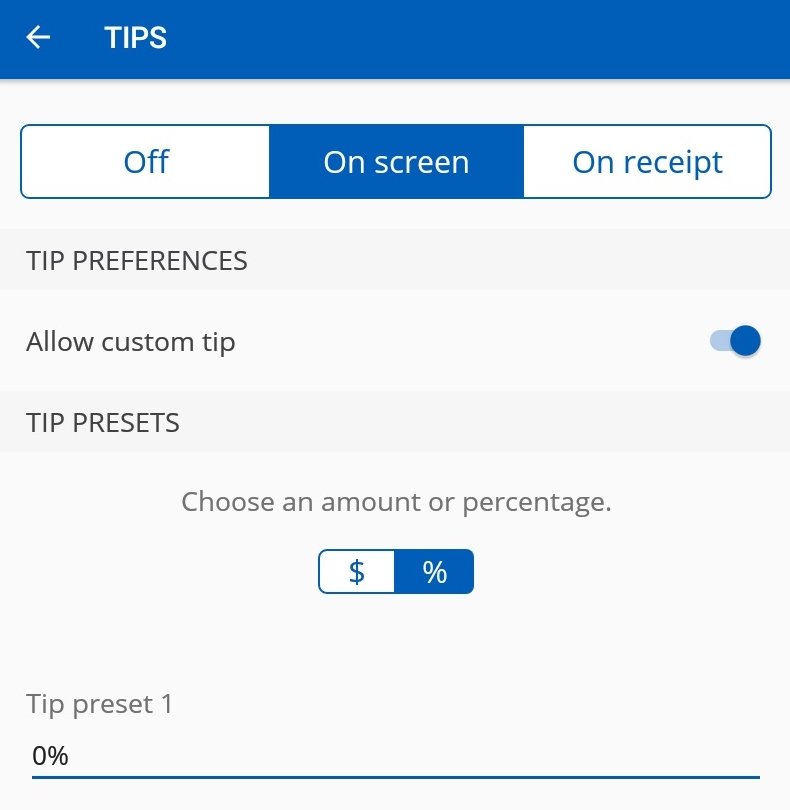
Off
This removes the presentation of the tip request from the transaction.
On Screen
This provides custom or preset tip options during the transaction.
On Receipt
This enables tips on the printed receipt, including the option to present tip suggestions.
NOTE: Choosing this option will force a printed receipt during a transaction. It'll also delay transaction completion for up-to 24 hours to permit Tip Adjustment. Transactions will auto-complete immediately on “Add tip” entry.
Yes. We enable setting up multiple tax rates to allow flexibility for those merchants crossing tax boundaries or offering products or services from different tax categories.
Yes. You can configure multiple preset discounts options to be available during a sales transaction.
Yes. This allows a user to optionally enable or require a 40-character, alpha-numeric, text field allowing merchants to capture additional information along with the transaction. Can be used to track specific events, reconcile invoices, or just capture additional sale details.
You can manage your reference code configuration directly within the Smart Terminal App. Here are the steps:
- Sign in to the Smart Terminal App.
- Tap the navigation icon in the upper left corner of the screen.
- Tap Settings to display the Setting screen.
- Tap Reference codes to display the Reference codes screen.
- On the Reference codes screen, you can indicate if a Reference code is Optional or Required, or isn't permitted.
Customize Receipts
You have receipts printed after each sale as a merchant receipt, or sent to a designated email address. The email address can be the one supplied as part of your merchant account or one of your choosing.
You can select merchant receipts to be both printed and emailed as desired.
NOTE: If you select the “tip-on-receipt” option in tip settings, a merchant receipt will always be printed.
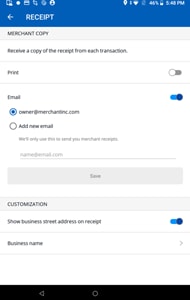
Merchant receipts are currently available to be printed (default) or to be emailed to the merchant account owner. The merchant details displayed on the receipt, including the merchant name and address are pulled from the merchant account details. Smart Terminal Printed receipts will also allow including an additional business name just for receipts and a setting to include or suppress the merchant's business street address.
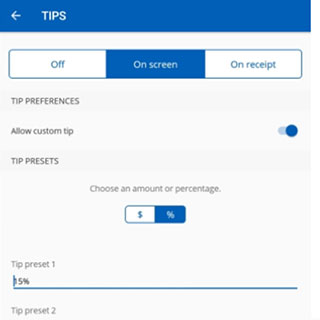
Tip settings
Yes. Here’s how.
Step 1:
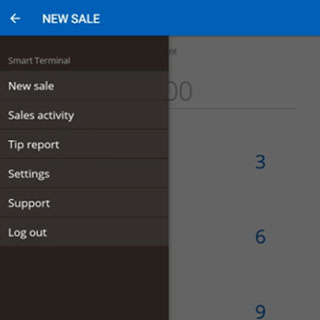
Using the navigation menu, choose the Settings menu option. This will load the merchant settings menu.
Step 2:
Choose Tips menu option (to disable tip requests from being presented to the customer, choose off)
Step 3:
Choose how you would like to present the tip request
Note: Customers have 24 hours to adjust or add to their tip amounts before they are auto captured.
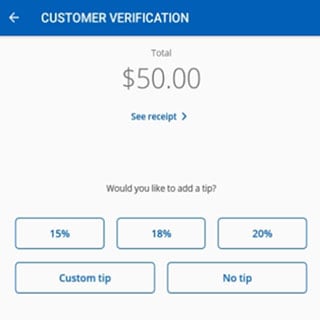
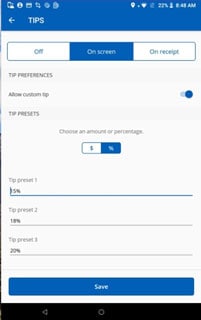
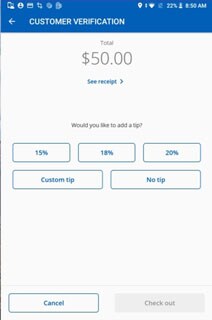
- Choosing this option the tip prompt will occur during the original sales process.
- Here you have the option to allow for custom tip entry and up-to three preset tip amounts, presented as either percentage or dollar amounts.
- For percentage based preset tip amounts, there is the option to display the calculated values.
Most often used in sit-down restaurant settings, this presents the tip as a written amount on the payment receipt. Tip suggestions can be enabled and up to three options can be provided.
- This option will force a merchant receipt to be printed, and thus requires paper in the receipt printer.
- You have 24-hours to add the tip amount to the payment transaction before it auto-settles with a $0 tip amount.
- Transactions still pending settlement will be shown as “Pending” in Sales Activity.
Yes. Here's how.

Step 1:
Choose option from the menu
Step 2:
On screen report is shown. A printed report can be generated through the receipt printer.
Step 3:
You can filter by a date range of 48 hours.
Process Refunds
- Find Transaction: filter and select the transaction
- Refund: after the transaction has settled, merchants can perform a refund Note: Option only available 60 days
- Refund Amount: Full or partial refunds can be issued; the refunded amount is tracked and cannot exceed the original sale amount. Minimum amount $1.00
- Refund Activity: View your recent refunds in the Sales Activity
The sales activity list allows you to filter and finds a transaction to review or take further action.
- Select option from the menu
- View the list of transactions
Two views- Payment Activity
- Refund Activity
- Filter the list of transactions by:
- Date
- Amount
- Reference code
- Transaction status
- Review the transaction details
- Date and Time
- Card Brand
- Amount
- Reference code
- Discount
- Tax
- Tip
- Available Refund
Resend a receipt directly from the Transaction detail screen within the Smart Terminal app
Sales activity – use search function to display the specific transaction detail screen
Resend – tap the resend button at the bottom of the transaction screen