Chase Mobile Checkout support
Find the help you need for any questions related to our mobile point-of-sale solution. Learn how to set up your card reader, tailor your application, process payments and view reports.
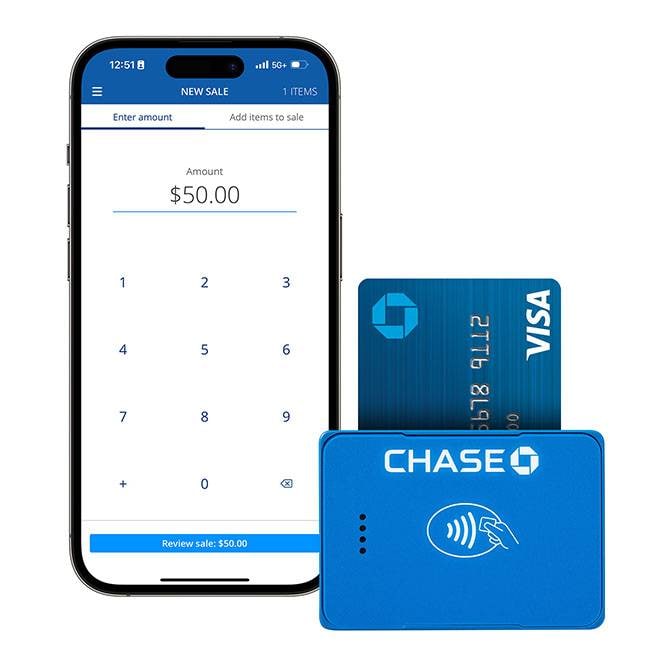
What is Chase Mobile Checkout?
Chase Mobile Checkout is Chase’s own point-of-sale solution that allows you to process credit, signature debit and select third-party gift card transactions on a mobile device. The solution comes with an application and a convenient, lightweight card reader you can easily take with you anywhere.
App features
See what you can do with the Chase Mobile Checkout app
- Take payments on the go
- Process credit cards, signature debit and select third-party gift cards
- Pair with a card reader
- Build a product catalog
- Monitor transactions
- Manage taxes & tips
- Send digital receipts


Unboxing your Chase Mobile Checkout Terminal
You just received your terminal. Now what?
1
Download the app
The Chase Mobile Checkout app is available for download on both the iOS App Store® and Google Play™ Store.
You can click directly on the mobile store icons above to take you there.
2
Activate your account
Launch the app to activate your account for the first time.
Follow the steps from the How do I sign in for the first time? FAQ for more information.
3
Pair your card reader
Follow the instructions in Getting started below to pair your card reader.
You are now ready to tailor your settings or start processing.
Where can I download the Chase Mobile Checkout app?
The Chase Mobile Checkout app is available for download on both the iOS App Store® and Google Play™ Store. You can click directly on the store icons above to take you there. The minimum software requirements for download are iOS 12 or above and Android 12 or above.
How do I sign in for the first time?
Follow the steps below to sign in and activate your Chase Mobile Checkout account:
- Download the Chase Mobile Checkout app from iOS App Store® or Google Play™ Store
- Launch the app to activate your account for the first time
- When you launch the app for the first time, accept the End User License Agreement and allow the app to access location services for transaction purposes
- Type in your username and temporary password, then press Sign In
- We sent your username and password in separate emails for security purposes
- You will now be asked to create a new password
- Once you have created the new password, you will be asked to receive an Identification Code. Choose your preferred method, phone or email, to receive the code from the list of contacts provided on the screen
- Once received, enter the Identification Code and password on the screen, then press Sign In
- You will now simply need to charge and pair your card reader to start taking payments. You can find all the step-by-step instructions in the other FAQs below
Chase Mobile Checkout FAQs
Explore the frequently asked questions below to get started to get started and customize your solution.
To turn on the card reader, press and hold the power button on the right side of the device, located just above the red LED light. If the card reader has no battery, look at the question below to help you charge it.
Note: To preserve the battery, the reader will automatically power off after three minutes of inactivity. Press the power button to re-activate the reader for the next transaction.
- Take the card reader and USB charging cable out of the box
- Connect the reader to a USB-compatible power source and charge for two hours
- Note: If using a computer’s USB port for charging, the reader won’t work while it’s connected to the computer. Unplug the reader from the computer while using
- On the right side of the reader you will see a LED light. It will flash red while charging and turn solid red when charged
- Turn on the card reader by pressing and holding the power button just above the LED light on the right side of the device
The red LED light on the right side of the card reader indicates the battery status:
- Battery full: Continuous red light
- Battery low: Red light flashes every 3 seconds
- Battery very low: Red light flashes every 6 seconds
- Battery out of capacity: No light
- Battery charging: Red light flashes every second
- Enable Bluetooth on your device
- Sign in to the Chase Mobile Checkout app
- Choose Settings on the main menu, then choose Card Reader
- Choose the Moby reader (MOB55-xxxxxxxx) in the list of available devices
- The “X”s represent the last part your reader’s serial number
- The device will ask if you want to Pair with MOB55-xxxxxxxx?, choose PAIR
- A pairing code will appear in the prompt to pair. Disregard the code. This reader pairs using an LED light sequence for added security
- Hold your device near the card reader and the LED lights will initialize, then display the LED sequence
- The lights will show as on, off or blinking
- When the sequence is the same in the app and the reader, press Confirm
- To see the sequence again, choose Replay
- On the next screen, toggle on Set as active device
- Once the reader is updated, press Save. The Moby reader will now be in Saved Devices
If you are having trouble pairing your card reader, ensure that the Moby reader is paired with your device through the Chase Mobile Checkout app, not the device’s system settings.
- If you see the Moby reader listed in the Bluetooth Settings, you will need to Forget the reader before you can pair it in the Chase Mobile Checkout app
- Choose the i icon next to the connected/not connected indicator for the Moby reader you are pairing. Then choose Forget This Device
For quick and easy access to accepting payments, Chase Mobile Checkout’s home screen defaults to NEW SALE. You can access all other features through the three lines/hamburger menu on the top left of the app:
- Edit Catalog: Create and edit your product catalog
- Sales Activity: Review activity, refunds, voids, reprint receipts
- Other Reports: Settlement, Chargeback, Fees, Funding reports
- Settings: Customize the payment experience to your business
- Notifications: Enable notifications to help you run your business
- Support: In-app support and frequently asked questions
- Sign Out: Signs you out of the application
Don’t see what you need?
Call 1-888-886-8869, visit this page or explore our website for more support.